Tuesday, January 28, 2014
Conclusion
Over Interim I learned many baking skills that I am going to miss using since I do not have a kitchen in my dorm. I guess that I will just have to find a friend and hijack their oven long enough to cook my bread. I learned skills that were not necessarily baking skills, such as making corn chowder and bacon jam, and made new friendships. It is nice to learn a skill that is extremely useful, and is a skill that I can continue to develop and strengthen as I make more bread.
Croissants
 |
| Cut croissant showing lamination |
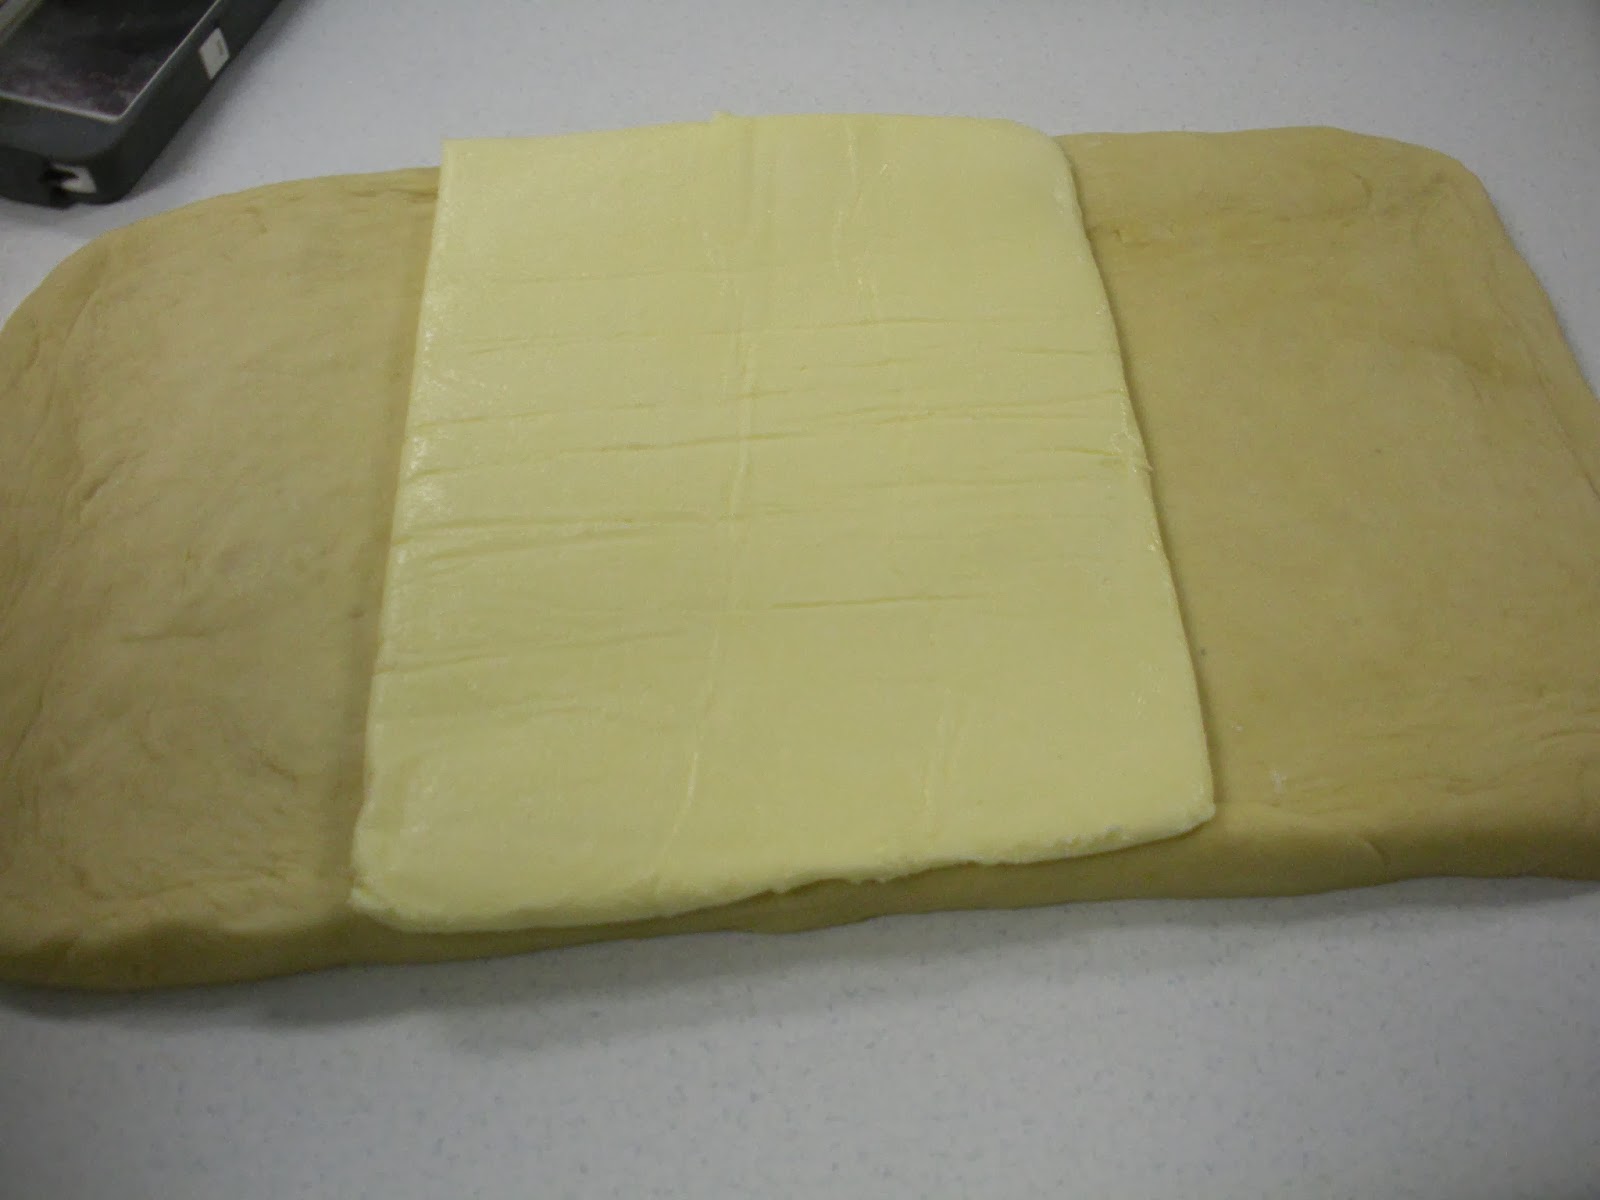 |
| Dough with butter block |
 |
| Filled pastries and traditional croissants |
Monday, January 27, 2014
Brioche
 |
| Traditional Brioche a Tete |
 |
| Brioche fresh out of the oven |
 |
| Cross-section showing crumb |
The brioche was delicious and was one of my favorite breads we have made. I want to try other recipes using the dough such as making doughnuts and seeing how it turns our. I believe that this dough would be great with fillings such as chocolate and made into small rolls. I had my brioche with lemon curd and it was wonderfully tasty. The brioche along with the challah would make wonderful french toast because of the richness of the bread.
Wednesday, January 22, 2014
Quick Bread
 |
| Cheddar bread showing parmesan crust |
large tasty chunks of cheese. The top and bottom of the loaf is covered in shredded parmesan which gives it a nice salty crust. The texture of this bread is more similar to a cake than traditional bread but had a very good taste. This bread would go very well with soup or chili and I would like to experiment with other combinations of cheeses and seasonings to try different flavors. Being a quick bread it would also work to be cooked in muffin tins for individual portions.
Thursday, January 16, 2014
No-Knead and Multi-Grain
 |
| "almost" no-knead bread |
 |
| Multi-Grain (notice the ridges from the basket) |
Wednesday, January 15, 2014
Ciabatta
 |
| Our ciabatta fresh out of the oven |
The ciabatta is the most relaxed dough we have used this far. Its hydration rate is so high that when the stretches and folds are done you must do them in the bowl to keep the dough from sticking to the
work surface. Once three or four sets of stretches and folds with 30 minute rest periods in-between are done, the dough is divided. To do this you must heavily flour the work surface and then pour the dough out and roughly shape into a rectangular shape. The portions are heavily floured on all exterior surfaces, and then placed on a well-floured bakers couche for the final proof. Today the key was to use heavy amounts of flour. The dough was placed on parchment and baked on the hearth which ensured a nice and crisp crust.
 |
| My delicious grilled chicken ciabatta |
Tuesday, January 14, 2014
Challah
 |
| One of our three strand loaves |
The challah was one of the most straight forward breads that we have created and it had wonderful results. First, a sponge of flour, water, and yeast was mixed and allowed to rise for 30 minutes. Meanwhile the other ingredients were gathered. These included flour, sugar, salt, honey, water, whole eggs, egg yolks, and vegetable oil. Once the sponge had risen all of the ingredients were mixed and then the kneading began. This dough was so stiff it took alot of kneading. It is better to work with a partner or your hands will be very sore. Once the bread had been kneaded enough to develop the gluten so it could pass a window pane test, the bread was allowed to proof for 75 minutes.
 |
| Berne Brot, featuring the Windsor Knot |
 |
| Unbaked loaves with egg wash |
Saturday, January 11, 2014
Pizza
To say that we created pizza on Friday would not be completely true as we made the dough on Thursday and allowed it to proof in the refrigerator overnight. This is known as "retarding the dough" and greatly slows the fermentation and creates a much more complex flavor profile. The dough was composed of bread flour, yeast, water, salt, and honey. This was mixed until incorporated before olive oil was added. It was then turned onto an oiled tabletop and kneaded until it was no longer sticky.
This took a VERY long time and required lots of patience. I felt like there was more dough stuck to my hands and the counter than to the dough itself, but finally it became less sticky and started to tighten up.
Since we let it rest in the refrigerator overnight all we had to do on Friday was make the toppings. We used several types of cheeses, bacon, Italian sausage, pepperonis, caramelized onions, mushrooms and peppers. My personal pizza was tomato sauce and pesto with mozzarella, fontina, and feta cheeses topped with pepperonis and caramelized onions. My pizza puffed up a little too much but it had a very airy light crumb that was very nice. It was much, better than most restaurant pizza except for select brickoven pizzerias.
For dessert we used our homemade nutella from the other day and marshmallows and bananas.
Someone made a calzone that included chocolate chips with the other dessert toppings and it was delicious. As much a I love pizza(this was the third time this week having it) this recipe is one that I will use frequently at home to make delicious pizzas.
 |
| Pizza dough awaiting toppings |
 |
| One of our prepared pizzas. |
 |
| Dessert Calzone |
Someone made a calzone that included chocolate chips with the other dessert toppings and it was delicious. As much a I love pizza(this was the third time this week having it) this recipe is one that I will use frequently at home to make delicious pizzas.
Baguettes
On Thursday we made what may be one of the greatest examples of artisan bread, the baguette. The baguette is made with a fairly simple recipe but the prep and shaping can be difficult and require careful attention to ensure good results.
A preferment known as a poolish is created the day before and allowed to proof overnight. This has a two-fold purpose, the first is increased air pockets and rise in the dough, the second purpose is the formation of a better flavor profile. The poolish was a much sticker preferment than the biga as it was created with equal portions of flour and water and a very small amount of yeast. This gave it 100% hydration, but required yeast to be added the next day.
The poolish was mixed with flour, warm water, yeast, and salt, today everyone mixed by hand using the technique we used on Wednesday. This dough was slightly stickier than the previous day but it came together very well. After proofing, the dough was streched and folded before being divided into four equal portions. This dough had a huge rise almost filling the bowl. The portions were roughly shaped before a second shorter proof. After this proof the dough was shaped in to the classic baguette log shape. These logs were placed onto a pleated bakers couche and allowed to proof for a final hour.
We used four different baking techniques for our baguettes. Two were placed onto baguette pans, one was a dark vented pan and the other pan was a shiny perforated pan. The final two loaves were baked directly on the stone hearth. One of these
loaves was scored in the traditonal baguette form and the final loaf was cut into what is known as a "dragon tail." The scoring is essential to having a good final shape. Most of our loaves had a very nice shape but one of the loaves had a slightly bulging shape which could be due to the cuts running horizontaly along the loaf instead of laterally.
The final product was very pleasing. It had a very nice golden crust with a nice crunch. The crust also retained some of the flour from the couche which created a nice color contrast. The crumb was very open and soft. Overall the bread turned out great and was worth the effort that was put in to the shaping and forming of the bread.
In addition to the baguettes we created "Touch of Grace" biscuits, strawberry refigerator jam and
cooked some country ham. The biscuits made with White Lily flour to ensure tenderness and the batter was much wetter than other biscuits I have made. The batter was tossed into bread flour for coating to keep each portion divided. These biscuits were extremely tender and fluffy and this may be my new go-to recipe for biscuits.
A preferment known as a poolish is created the day before and allowed to proof overnight. This has a two-fold purpose, the first is increased air pockets and rise in the dough, the second purpose is the formation of a better flavor profile. The poolish was a much sticker preferment than the biga as it was created with equal portions of flour and water and a very small amount of yeast. This gave it 100% hydration, but required yeast to be added the next day.
 |
| Shaped dough on pleated couche |
We used four different baking techniques for our baguettes. Two were placed onto baguette pans, one was a dark vented pan and the other pan was a shiny perforated pan. The final two loaves were baked directly on the stone hearth. One of these
 |
| Dragon Tail Baguette |
 |
| Inner crumb structure of baguette |
In addition to the baguettes we created "Touch of Grace" biscuits, strawberry refigerator jam and
 |
| Touch of Grace biscuits |
Friday, January 10, 2014
Pane Francese
I've gotten a few days behind but on Wednesday we made Pane Francese, which is Italian for "French Bread." So is it French Bread or Italian Bread? The world may never know. This bread was much chewer and crustier that the Pain de Mie that we created on Tuesday. The reason for this is that we created a pre-ferment know as a biga that day before that was allowed to set in the refrigerator overnight. The biga is a very firm preferment which is caused by its lower 60% hydration.
 After fermenting overnight the biga is cut in to pieces and placed in to warm water before being mixed with more bread flour and salt. Since the mixers were taken we chose to mix by hand. This involves a stretch, slap and fold technique that is shown in the gif. This process is repeated at least 300
times until a window-pane test can be done, which is where you stretch a small amount of dough to test the gluten networks.
We then let it proof before dividing and shaping. The other groups formed their Pane Francese in to rolls, but we decided to create Fougasse. Fougasse is a flat, decorative bread that is many times given as a gift due to its attractive appearance. The name is derived from Latin for hearth because it was originally baked in the ashes of fireplaces. Instead of baking ours in ashes, we cooked ours on a stone baking hearth which gave it a nice crispy crust. It was brushed with olive oil and sprinkled with salt and pepper before baking to give
it flavor and a nice crust. Many times people sprinkle it with herbs such as rosemary to increase the flavor. The cuts are made to resemble a flower, as seen in the pictures.
Our Fogasse turned out very nicely with a texture similar to breadsticks. The crust was thick enough to give a contrast to the extremly open and chewy crumb. This bread would pair greatly with pasta and makes three fougasse so it is also good for gifting.
In addition to creating the fougasse me and my partner made homemade Nutella. It blew commercial Nutella out of the water. We first toasted hazelnuts and then placed the toasted nuts into a bowl which was covered and then shook to remove the skins. I found that placing them in a dish towel and rubbing and hitting the dish towel removed the skins much more efficiently but it made for a very dirty dish towel, just pick which you would rather have more skins or a dirty towel. The nuts were placed in a food processor and processed until it formed a smooth paste. The paste was mixed with hazelnut oil, powdered sugar, and cocoa powder to form the final product. It was divine and I plan on making it for myself, "all for my self!"
After fermenting overnight the biga is cut in to pieces and placed in to warm water before being mixed with more bread flour and salt. Since the mixers were taken we chose to mix by hand. This involves a stretch, slap and fold technique that is shown in the gif. This process is repeated at least 300times until a window-pane test can be done, which is where you stretch a small amount of dough to test the gluten networks.
We then let it proof before dividing and shaping. The other groups formed their Pane Francese in to rolls, but we decided to create Fougasse. Fougasse is a flat, decorative bread that is many times given as a gift due to its attractive appearance. The name is derived from Latin for hearth because it was originally baked in the ashes of fireplaces. Instead of baking ours in ashes, we cooked ours on a stone baking hearth which gave it a nice crispy crust. It was brushed with olive oil and sprinkled with salt and pepper before baking to give
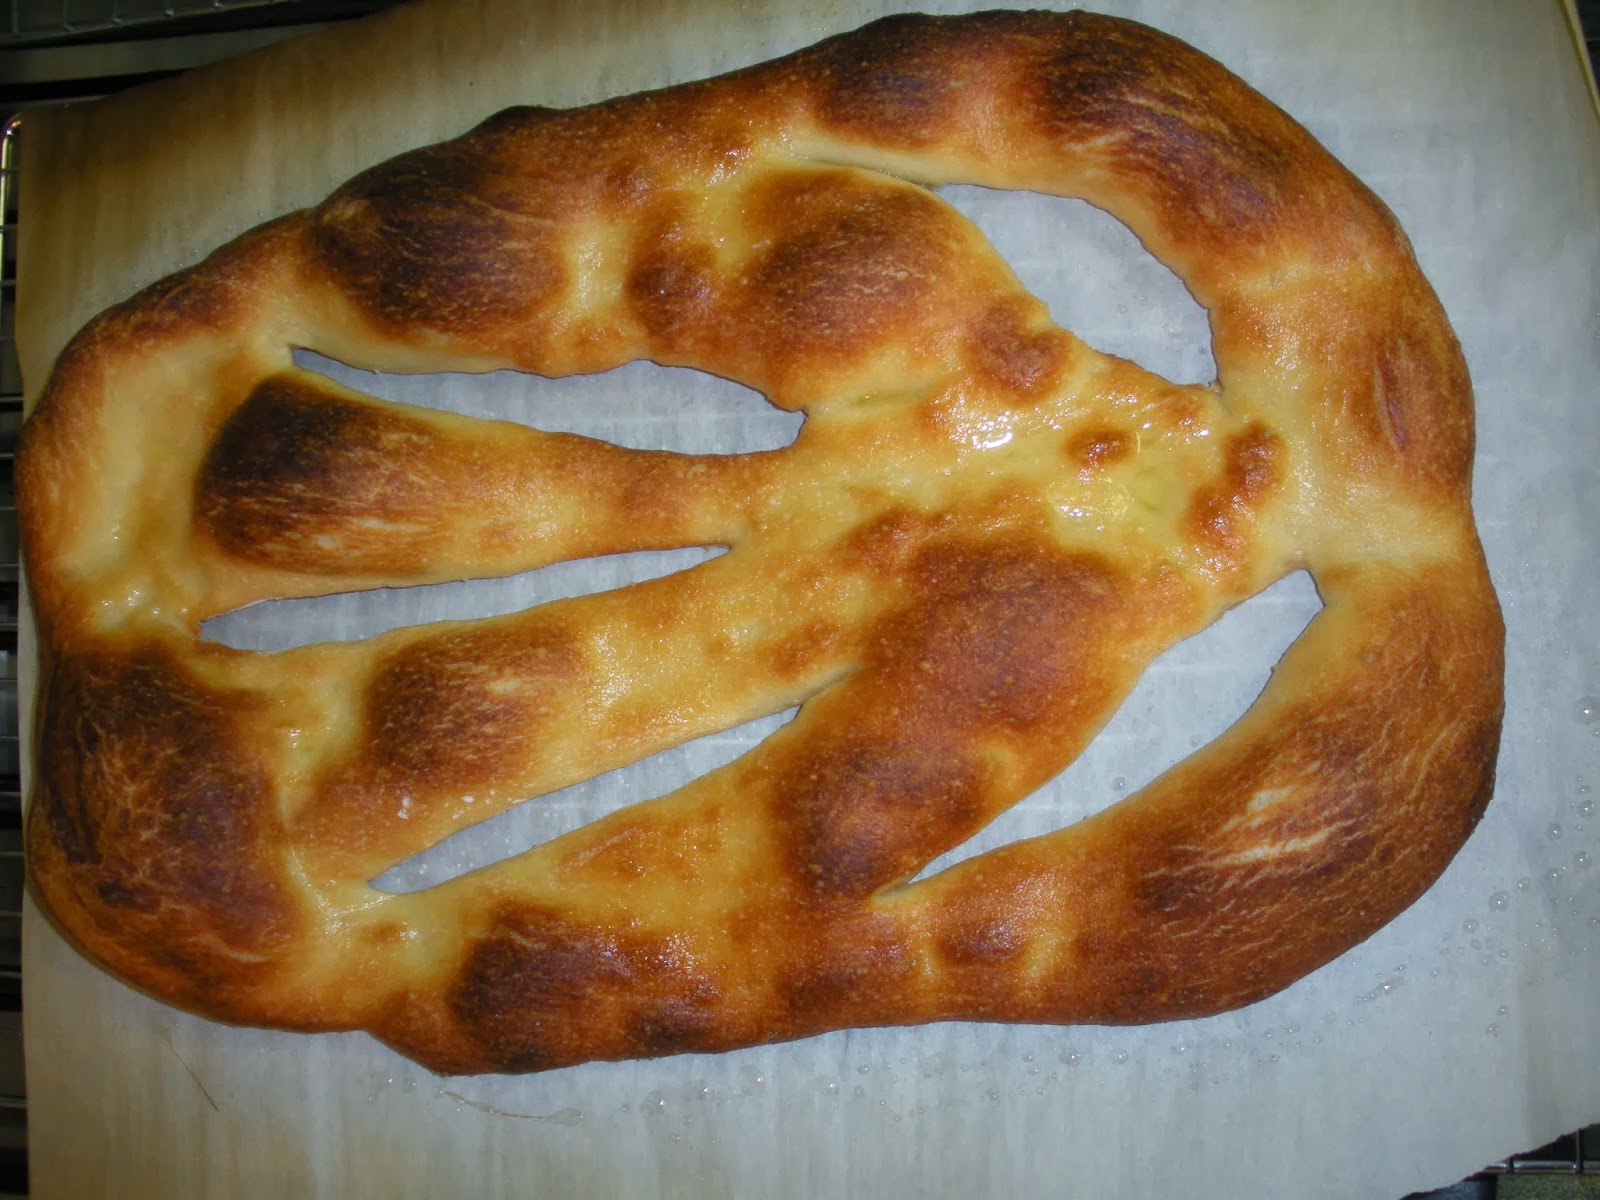 |
| Our Fougasse |
Our Fogasse turned out very nicely with a texture similar to breadsticks. The crust was thick enough to give a contrast to the extremly open and chewy crumb. This bread would pair greatly with pasta and makes three fougasse so it is also good for gifting.
In addition to creating the fougasse me and my partner made homemade Nutella. It blew commercial Nutella out of the water. We first toasted hazelnuts and then placed the toasted nuts into a bowl which was covered and then shook to remove the skins. I found that placing them in a dish towel and rubbing and hitting the dish towel removed the skins much more efficiently but it made for a very dirty dish towel, just pick which you would rather have more skins or a dirty towel. The nuts were placed in a food processor and processed until it formed a smooth paste. The paste was mixed with hazelnut oil, powdered sugar, and cocoa powder to form the final product. It was divine and I plan on making it for myself, "all for my self!"
Tuesday, January 7, 2014
Pain de Mie
 Today was the first day of baking and it was an experience. I love cooking and cook quite often when I am at home but I am unable to cook often at school due to the lack of a kitchen. This was my first time using mass to measure ingredients and I already plan on buying myself a kitchen scale, its nice not to have a large pile of measuring cups and spoons to clean when you are done cooking.
 We used the basic Pain de Mie loaf from Ciril Hitz's Baking Artisan Bread. The prep was very straight forward and the recipe came together quite well. At first we did not believe that our bread was rising well but we ended up with a very good result . It is a basic sandwich bread with a nice texture without being overly chewy. It has a much richer flavor than commercial sandwich bread which I believe is largely due to the use of whole milk and butter.
The recipe was geared towards using a lidded Pullman pan but we used a regular loaf pan and instead of cooking at 375 for 30 minutes covered and lowering to 350 for 15 minutes uncovered. We cooked it at 350 for the duration of the baking period. The recipe advised removing the bread from the pan and cooking it for 3-5 minutes directly on the rack and this gave the crust a very nice brown color.
If I added anything I would use and eggwash to give the crust a more appealing shine as it has a slightly dull appearance. I would recommend this recipe for anyone that is wanting a easy, one-day bread that is going to be pared with something such as sandwich filling.
Introduction
I'm Jon Nick a Junior Chemistry major and Government minor at Wofford College with a love for cooking. For the month of January I'm taking an Interim on Artisan Bread baking. I will be using this blog to chronicle my baking and hope to continue using it in the future to post on my culinary adventures. Please feel free to ask me any questions and give me any advice or just come along for the ride.
Subscribe to:
Comments (Atom)